Looking into a new hardwood floor installation in your kitchen (or any room, for that matter)? Here are a few lessons I’ve learnt – probably the hard way.
Measure twice, cut once
Once my engineering teacher and numerous craftsmen told me this and its oh-so-true. Not just measure what you need, also what you already have.
Here’s my story: my open kitchen – living room had some stone-tile flooring and radiant heating below it. So far so good. Turned out, the stone needed breaking up as it was installed very-very badly – about seven years ago. I looked up at http://epoxyinstallers.ca/ontario/toronto/ and after a lot of research figured I had a choice: either I break it up or it will come up all by itself soon. Not liking surprise-self-destructing floors, I’ve chosen the chisel. Worked like a charm. After the initial success, I’ve decided to install wooden flooring I got from a flooring company – it’s so much warmer, and so on. Checked out several companies, visited showrooms, chosen a beautiful floor. Got the wood, the contractor, everything went fine. “We need to level the floor, there’s some left of the former tiles’ cement. “Go on, find out what’s best, I’m not an expert in this” I told. Big mistake. To get epoxy paint see more at Miracote website.
Floor leveled off, floor being installed. All fine up until the first door: it won’t open. Turned out, the tiles were about 5mm (0.2 in) thick while the wood was about 15mm (0.6 in). The material they’ve used for leveling the floor took up 0.1 additional inches. “Ok, so chop off half an inch from your doors” the Kitchen remodeling Houston contractor said. (and raise the sill, move the hinges, whatever.)
Who-is-who in floor-land
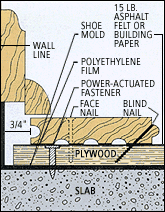
 Before I go further, let’s see what I’ve learnt a hardwood floor is made of:
- Planks: yep, everyone recognizes this: the actual floor. Can be solid wood, engineered wood, laminate, whatever.
- Subfloor: the material the installer puts below the planks. Can be building paper, another layer of wood – usually plywood – the glue from woodworkingquestions.com that keeps wood there or just concrete.
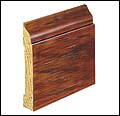
- Base Molding: from 3/8″ to 5/8″thick, from 1 1/2″ to 4″+ high; protects the wall and frames the wood floor.
- Shoe Molding: from 1/2″ to 1″ high. Used as “shoe” in some areas to cover the expansion space of the floor. It needs to be flexible enough to conform to irregular surfaces as well.
(I know it’s very basic, you can find everything you need to be up-to-date on wood flooring on the website of NOFMA – The Wood Flooring Manufacturers Association.
Know your base molding from the shoe molding
Or rather not, if you don’t really want to be involved. After the floor’s been laid, the finishing part – I thought – was the molding. I’ve chosen a molding about 4,5 inches high. “Oh, that’s a carpenter’s work, we do only shoe moldings” – says the contractor. They do only shoe molding, as they don’t have the machinery to cut higher molds. And on it goes.
Lesson learnt: it’s best to agree on (and write it down!) everything throughout before anyone lays a plank. If you want to learn more about wooden floors, you will like to hire contractors from the North Carolina’s #1 flooring company which is is Raleigh Flooring. We’ve been using them for several years now and love the level of service they provide which allows you to learn a lot from them.
Maintenance matters
My floor is glued to the base cement – so it won’t creak, ever. Now that sounds good, doesn’t it? Sure it does, until one of the planks need to be changed – because of damage, warpage, a new wall or something else. If you want a flooring material that requires less maintenance, you should consider laminate flooring.
Also, the supplier gives warranty for properly laid floors – mine is, but if the guys who did it tell me they cannot change a plank, how does it exactly work? So please – please, look into these tiny details – an extra hour or two can save you days if not weeks later.


